Digitizing is the process of converting your image from a standard file into a format that can be understood by sewing machines. This involves coding specific information like the number of stitches, color and dimensions along with specifics like the kind of stitch. Different software can handle this process differently, but the end result is the same — a custom design file based on your specific fabric type, machine and dimensions of final output. Here is a very general overview of how to go about digitizing an image for embroidery purposes.
1- Pick the image that you want to digitize.
This can be as simple as finding an image online. The best images for embroidery purposes are cartoon like with strong lines, brush strokes and vivid contrast between different elements. Images that may not come out as well as real life portraits or images of things that have a tremendous amount of detail without clear shaped lines. Blurry or low resolution images could also be a problem when it comes to digitizing. While these types of images are not necessarily a complete no go for embroidery there are more steps needed to make them worthy of the design process meaning potentially more time on the computer or more advanced techniques.
If you are picking a completely custom image like the ones mentioned above, using filters is a good option to make your image more design friendly and useful for practical application. In Photoshop some good filter options are Oil paint or liquify. Canva also has quite a few useful tools like the duo tone filter or the tracing application which can make solid shapes and lines even out of the most detailed of shapes or patterns. These simple steps to make solid lines are a precursor to the actual design process but can be tremendously helpful before importing your design into standardized embroidery software.
A lot of embroidery machines come with in built designs or fonts that can be used for drawing simple shapes, words or prints. This is your best bet as a beginner, as the files are already digitized and you just need to load up the machine before pressing start. If you have a message that you would like embroidered picking one of the inbuilt fonts and typing the message on screen is also an option. Are built designs vary significantly based on the specific machine and often times can address many interests or areas that you could be looking to images for.
2 — Select an embroidery design software
This is a vast area that really can take a lot of time to explore in itself. Embroidery software varies significantly in terms of scope, capacity and price point. Depending on the machine you are working with there may be other limitations to consider such as hoop size (which means the total dimensions of the design that can be handled) and the variety of stitches that it may be able to handle. These are some of the most commonly known embroidery software:
Creativate is the default option when working with Singer sewing machines. Formerly Sewnet this software allows for online design functionality through a cloud based system. There are a number of pricing options from monthly to license purchases with different features at each point. There is a free option available that allows for view ability when it comes to purchasing designs. The minimum monthly plan starts at 9.99 (in 2025) and features a mobile app that has some design functionality. The benefit of this software is that it does offer a number of support options, though you are still relatively independently expected to work on images when it comes to digitizing. There are a number of helpful tutorials on their website and practical guides for more than just embroidery. This site includes quilting, design patterns and general sewing with Singer machines, many of which are known for detailed general sewing techniques that can produce beautiful embroidery without actually getting into your custom images.

Hatch is another well known and incredibly versatile software that takes a lot of the guesswork out of digitizing. Where other software may require an advanced artistic capacity or technical understanding this is an all in one solution that can even take complex design work into a usable format. Pricing is a bit higher on this software with licenses ranging from just over a hundred to over a thousand dollars (in 2025). It also has the challenge of licenses being restricted to an individual device along with limited mobile functionalities. There is a 30 day free trial which is great to try it out and might be just enough for light usage. One of the advantages of this software is the automatic stitch digitizer function which can nearly instantaneously render a fully usable design file without a lot of the guess work that comes with other design systems or types. They also feature a number of great tutorials and guides in the Hatch academy that can make amateurs and experienced embroiders alike succeed.
Ink Stitch is a plugin that can be integrated with Inkscape software to create compelling design elements for embroidery, cricut and other forms of vector art. It is by far the most affordable (open source and free in 2025). While this extension installation can be done on most computers (PC, apple and linux) it is generally for the more advanced computer users. Its also good to be aware that there are 2 different software makers involved in this process and limited support/tutorials like other competitors. However there are a number of useful youtube videos that provide good solutions to coming up with properly digitized images using these free tools. It does also allow for export in a variety of formats for Brother, Singer and other major machine manufacturers.
There are a number of other softwares available out there for embroidery software. From personal experience many of those that offer the most support for beginners end up having a slightly higher price tag. Here is a great synopsis of some of the good options out there, albeit a bit dated.
3- Start digitizing
If the above options are overwhelming, it might be advisable to simply opt for a professional to digitize your image. Etsy has some great options when it comes to digitizing, most under $10. For beginners or those with only a few designs to work with this is by far the best option.
For more complex designs you may need to find a service provider with extensive experience. Digitizing itself is an art and a professional service offered by many on Fiverr. They can work with even the realistic or otherwise hard to achieve affects taking your idea to a completely digitized image. These options can be a bit more customized in pricing and also the timeline but are nonetheless cheaper than many of the design software.
After considering all the options if you are still brave enough to brave the world of digitizing, its time to open the image in your selected embroidery software of choice. This can be as simple as importing the jpeg, or png file into the software to start off. While every software is slightly different these are some steps that you will likely encounter in the process:
Selecting the number of colors
This means simplifying the image to be replicated by the sewing machine with a set number of colors. Some images may have multiple shades or colors even it if appears to be simple. One of the preliminary steps is to simplify the embroidery pattern so that it uses the least number of colors and slight shades are merged so that it is easier for the machine to process it overall. Having fewer colors means there are less times when you have to change the thread during embroidery. Pre-made designs that are purchased or rendered from a professional should be accompanied by this information so you know what color threads to buy/ have on hand to achieve the best end result.
Picking the style of stitch
One of the greatest and most creative parts of digitizing is picking the style of stitch for each part of the image that you are working with. Tatami is one beautiful style that can create vivid images and is frequently used for brand, logo, and other commonly seen embroidery styling.
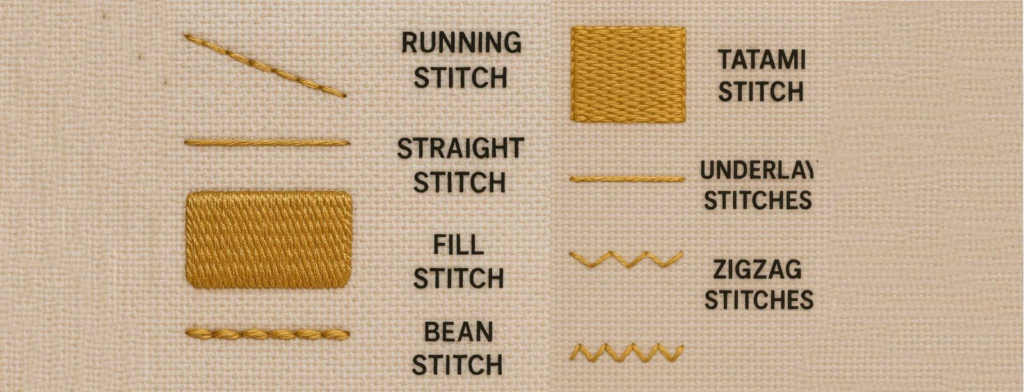
Depending on the effect you are going for, capacity of the machine that you are using and even the specific style of thread the options are limitless when it comes to embroidery digitizing. This is where auto digitizing features on certain software can take the guess work out to help you achieve an end result.
Select options for every layer
Digitizing means that every part of the image you upload will be deconstructed into shapes that overlay one an other. This is to represent the path the machine will take when creating the design. Embroidery machines do not necessarily create images like a printer, which operates line by line from the top to the bottom of the page. Instead it may create a contoured path in order to complete the use of a complete color or shape before proceeding to the next one. This differs based on how the image is designed and much of it can be controlled through the layering functions addressed in digitization. Overall this article is meant to be a general overview, but the process of digitizing is an art from that can take a lot of education and practice to perfect.
Export your design
Once you have selected the stitch style, color and pattern for your image its time to export the design in the right format for your embroidery machine. This can vary significantly based on the model of the specific embroidery machine. For example, Singer uses XXX. Brother uses PES. Both may accept DST depending on the specifics. One thing to check before exporting is the dimensions of your image — the measurements should be within one of the specific hoop sizes for your machine. Otherwise even a properly formatted design image may not be readable or opened on the machine. Hoop sizes are also specific to your unit so its important that you make sure the image is smaller than the suggested hoop size for best results. Once you have the file saved in the correct format, its time to load it onto a USB drive. Most machines use this method of moving the image from the computer interface to the embroidery machine. Using the on screen touch display you will be able to navigate between pre-loaded designs and those that are present on the flash drive that is inserted.
Estimation of time and number of stitches
Once the design is loaded to the machine it will display the number of stitches. In some cases this will also display an estimation of the time it may take to complete the embroidery. Depending on the machine it becomes possible to adjust the speed at this point which may affect the timeline. The most valuable part about this part is knowing whether you will be able to complete the design at one stretch. It is generally not advisable to start an embroidery without having enough time as it can be difficult to pickup in the middle of a design at a later time. Within the same scope, it is important that you can keep the machine plugged in and limit and other breaks or interference in order to complete the design.
These are some of the things to consider when digitizing an image for embroidery. It is important to keep these points in mind ahead of time so that you have the best experience when digitizing. Some other elements to consider after you have a properly digitized image is the correct stabilizer, and proper thread to load into your machine. Happy stitching!
Comments